Showing posts with label ssd. Show all posts

Monday, August 16, 2010

Icy Tip: Use the Super Speed USB 3.0 HDD Enclosure MB668U3-1SB with a SSD for a Portable Operating System (OS)


Portable operating systems can be beneficial for practically any user in almost any situation. Regardless of profession or occupation, a majority of today's users tend to operate on several different computers for their daily functions. Users can utilize their personal desktop preferences on multiple systems by using a portable OS on any computer that is capable of booting from a USB drive. This means that you can carry all your personal desktop settings, applications, music, and documents with you on a single portable device. Utilizing a portable OS is also effective if you need to access any data from a hard disk of a computer that has crashed or won't boot. It is the perfect solution for students and or business people that are always on the go and hate having to use different computer systems or worrying about compatibility of programs.

With current technology, you can take the portable OS to even greater lengths by utilizing Super Speed USB 3.0 and a Solid State Drive. This way, your portable OS will be low powered and extremely fast. Solid state drives are also known to be much more shock resistant than normal disk hard drives, a feature that is very important considering that the device will be mobile.

Icy Dock's new MB668U3-1SB is a small tool-less external 2.5" SSD/HDD enclosure with the Super Speed USB 3.0 interface that can reach transfer speeds of up to 5.0 Gbps! That is 10x faster than USB 2.0! This state of the art enclosure is manufactured with an aluminum body optimal for cooling and durability. It conveniently fits into a pocket with its extremely light weight and small size. The MB668U3-1SB is the perfect enclosure to use for a portable operating system.


Setting up an operating system on a SSD in a portable enclosure like the MB668U3-1SB is a much simpler process than most people think. For example, let’s say that you want to install Linux Ubuntu on an Intel X25-M or OCZ Vertex SSD. The Ubuntu website gives excellent instructions on how to use the boot/install image from a CD or thumb drive, and gives instructions on how to do it from a PC, MAC, or Linux based operating system. First, go to http://www.ubuntu.com/desktop/get-ubuntu/download and select the version you wish to download (32 or 64 bit). Then select whether to boot from a CD or thumb drive, and what operating system you will be using to create the boot tool. Now, here comes the magic: after you boot to your CD or thumb drive, you can choose to install Ubuntu to the machine. During this process, you can choose the MB668U3-1SB with your SSD inside as your target drive, and just like if you were installing it to a system drive, Ubuntu will be placed on your mobile drive. 

Once you have Linux installed on the SSD in your super speed USB 3.0 MB668U3-1SB, you’ll be ready to run your portable OS from any computer as long as it is capable of booting from an USB device.* Simply change the boot order of your BIOS, or enter the boot menu of the BIOS and select your USB drive. This will give you native speeds from your processor, memory, video card, and all system features from any system that you decide to boot from.


But what if I can't utilize the super speed of MB668U3-1SB because my computer doesn't support USB 3.0? Not to worry, there are simple and affordable solutions for upgrading your computer to USB 3.0! Currently, there are several USB 3.0 PCI Express cards such as the ASUS U3S6 that can add two USB 3.0 ports on your computer at a low cost of only about $30. There are also several low priced USB 3.0 adapter cards on the market for use with notebook computers. If you plan on using an adapter card, it is important to make sure that your motherboard can support booting from the adapter card.** USB 3.0 is also backwards compatible with USB 2.0 which is available on almost all computers!

Using the MB668U3-1SB with a SSD for a portable Super Speed OS is an excellent solution for users that are always on the go and are looking for a consistent use of the same OS on multiple computer stations. It is convenient and cost efficient compared to other all-in-one portable operating system options which retails from $220.00 to $820.00 depending on the size of the SSD. Icy Dock's MB668U3-1SB is also certified by Gigabyte! Make your daily computer use at home, work and school easier with the MB668U3-1SB as a small portable Super Speed operating system!

Icy Dock's USB 3.0 MB668U3-1SB:
http://www.icydock.com/product/mb668u3-1sb.html

Ubuntu Homepage:
http://www.ubuntu.com

*Motherboard must support booting from USB device in order to run a portable OS, check your motherboard manufacturer's user manual for more details.

Recommended Solid State Drives:
Intel X25-M
OCZ Vertex Turbo
Super Talent Ultra Drive ME
Crucial M225 & Crucial RealSSD
Kingston SSDNow

Recommended products for upgrading your system to USB 3.0:
USB 3.0 PCI Express Adapters:
Asus U3S6
Gigabyte GA-USB3

USB 3.0 Motherboards:
Asus P6X58D Premium
Asus M4A89GTD PRO/USB3
Gigabyte GA-X58A-UD3R
Gigabyte GA-790XTA-UD4
MSI Big Bang-XPower
ASRock X58 Extreme 3

**USB 3.0 adapter cards have a confirmed compatibility with the MB668U3-1SB as long as it uses the NEC uPD720200 host controller chipset.

Tuesday, December 22, 2009

ICY TIP: How To Mount A 2.5" SATA SSD Into 3.5" Internal Drive Bay


In the last five years, the computer industry has seen fantastic leaps in technology. Processors are becoming exponentially faster, hard disk storage is becoming increasingly less expensive, and most of all, flash memory is slowly taking over the data storage market. I am of course talking about solid state drives, or as you may know them, SSD. It yields much faster read and write speeds, and is not limited by the rotational speed of a physical disk. Some top of the line SSDs have reported over 200 MB per second read speeds, and over 100 MB per second write speeds (i.e. Intel X25-M, OCZ Vertex Turbo, Asax Leopard Hunt II T2, Crucial M225 & A-Data S592). This is nearly double that of a single hard disk drive spinning at 7200 RPM.

Click the following link for 2009 Flash SSD charts:

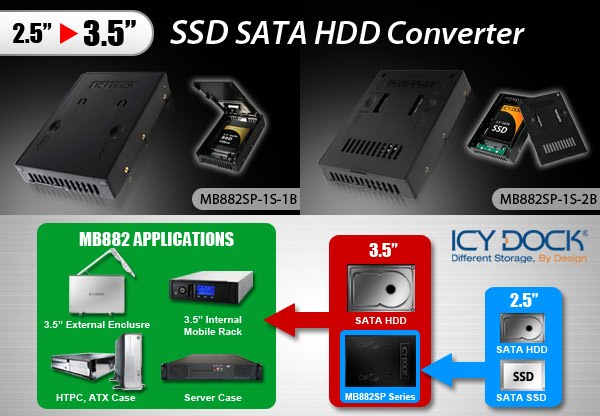
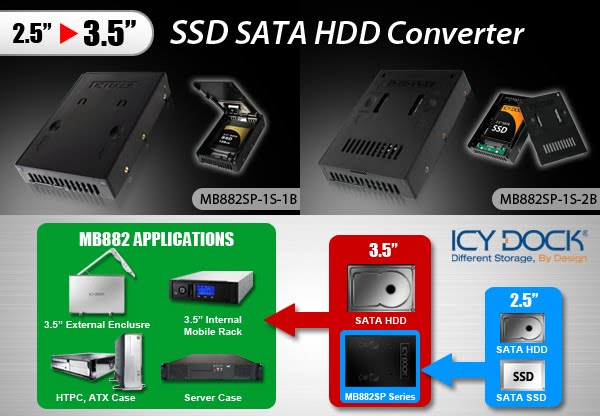
The only problem with integrating an SSD into most current systems is that it conforms to 2.5” form factor, while almost every computer case (i.e. ATX case, Micro ATX case, HTPC case & server case) on the market is only set up to use 3.5” drives internally. To overcome this obstacle, we have created an ideal device to allow users to keep their systems intact, and make a huge system upgrade in a matter of seconds.

The Icy Dock MB882 Series 2.5” to 3.5” Converter takes any standard 2.5” SATA SSD and transforms it into a standard sized 3.5” SATA drive. Everything is identical to a normal 3.5” hard drive, including dimensions, mounting holes, and connection locations. This allows you to use it with an internal drive bay, a hot swap mobile rack, RAID backplane, or even an external drive enclosure. Utilizing an SSD will increase the overall performance of any system. Whether you are a power user who likes to have multiple operating systems, or a video editor who needs every resource working at its maximum potential, there are benefits to be had.

Hundreds of thousands of units have been sold in just the short year it has been on the market. And with flash memory steadily becoming more affordable for users, there is no reason to hold out on giving your machine the upgrade it deserves.

ICY DOCK MB882SP-1S-1B Product Page

ICY DOCK MB882SP-1S-2B Product Page

Wednesday, October 07, 2009

Product Naming Contest!


We need your help naming some of our new products! If we decide to use your name, you win the product!


Here are the products to name:


MB662US-2S – Dual Bay RAID Enclosure for 3.5” SATA Drives featuring eSATA & USB.


http://www.icydock.com/product/mb662us-2s.html


MB668US-1SB – 2.5” Mobile Enclosure for SATA HDD & SSD featuring eSATA & USB and OTB Function


http://www.icydock.com/product/mb668us-1sb.html


Contest Rules:

  1. One Entry per Person.
  2. U.S.A. and Canada Only.
  3. Only 1 of Each Prize Will Be Awarded.
  4. Deadline for Entries is 12/01/2009.


Remember to be creative with your names! You only get one submission!


Please reply to this post with your entry, as well as your email address and name so that we can contact you if you win.


Good luck!


-Team Icy Dock

Thursday, April 16, 2009

UTILIZE AN EXTERNAL HDD WITH YOUR XBOX 360!


Following up to our previous installment, we will now walk you through how to set up your Icy Dock with the Microsoft XBOX 360.

Previously, the XBOX 360 did not allow users to use an external HDD with media to be played through the system. However, with recent updates for the XBOX 360, users now have many different options for playing media. And with the expensive, yet restrictive hard drives developed by Microsoft for specific use on the XBOX 360, users have been on a constant search for the best solution.

Using an Icy Dock to expand your media center experience via the XBOX 360 allows you to have almost unlimited storage capacities for movies, photos, and music. Simply drag and drop your media into an Icy Dock, and plug it into the XBOX 360 with a USB interface. What this installation guide will show you is how to correctly format the drive for use with the console.

Items you will need
*XBOX 360 (internet connection required for possible media updates)
*Icy Dock Enclosure using a USB interface
*Hard Drive or Solid State Drive for use in the Icy Dock
*PC or Mac
*Movies, Picture, and Music for playback on XBOX 360

Step 1: Format The Drive
*The drive needs to be formatted in FAT32 (MS-DOS File System) for it to be recognized by the XBOX 360.
*Windows Users – Windows can only format drives in FAT32 up to 32GB. To format it to its full capacity, you will need to use a program called Swissknife (http://www.compuapps.com/download/Swissknife/swissknife.htm) or use the command line method from the PS3 guide.
*Mac Users – Open up Disk Utility, and format the disk using MS-DOS.
*Formatting the drive will cause all data on the drive to be lost. Back up anything important before proceeding with the Formatting.

Step 2: Put Media On The Drive
*Since the XBOX 360 is essentially a computer, it will recognize the folder format of your drive. The easiest way to organize your media is Video, Music, and Photos.
*There is no need to re-organize folders within the main folders. For example, a folder holding all your TV shows can be left alone. The music folder organizing all albums or artists can be left alone. The picture photo organizing all photo albums or collections of photos can be left alone.
*Supported video formats
-MP4, AVI (some do not work), WMV, MOV
-The XBOX will display a file with a line through it if it is not playable.

Step 3: Connect The Drive To Your XBOX 360
*Connect the USB cable to the front or rear USB port. If you are using a using a 2.5” drive in the Icy Dock, the power from the USB will be enough to power the drive. All 3.5” applications will require the power supply.
*Go to the Video, Picture, or Music library, and search for your Icy Dock, listed as a portable device.
*Select your drive, browse, and enjoy!

SOFTWARE
*Free and effective open source programs for converting video
-Windows: Media Encoder (http://mediacoder.sourceforge.net/download.htm)
-Mac: FFMPEGX (http://homepage.mac.com/major4/download.html)

SUGGESTED ICY DOCK PRODUCTS


*MB881US-1S
-Fits all 2.5/3.5’’ SATA HDD and SSD
-eSATA and USB interface
-2.5” drive powered by USB when plugged into XBOX 360


*MB559 Series
-Fits all standard 3.5” drives, and 2.5” drives using the MB882SP-1S converter
-eSATA/USB, USB/FIREWIRE400, USB/FIREWIRE800 available
-Available in black, white, and mirror black
-Utilizes are tray system. Spare trays also available.


*MB664 Series
-Fits all standard 3.5” drives, and 2.5” drives using the MB882SP-1S converter
-eSATA/USB, USB/FIREWIRE400, USB/FIREWIRE800 available
-Available in black, white, and mirror black
-Screwless design


*MB663UB Series
-Fits all standard 2.5” SATA HDD and SSD
-Built in USB male plug
-Powered XBOX 360 via USB
-Available in silver and black

Tuesday, April 07, 2009

Utilize an External HDD with your PS3!


How To Set Up Your MB559 Series OR MB664 Series ICY DOCK With PS3

MB664 (Shown in Mirror Black)

MB559 Series (Shown in Mirror Black)

Playstation 3 represents a new level of cutting edge video game technology. Not only does it allow you to play mind numbingly realistic games, but it has built in capabilities to play all your media. The problem however, is that the out of box unit places capacity restrictions on the user in terms of its hard drive. To solve this problem, you can replace the internal 2.5" SATA drive with a larger drive, or save yourself some time and simply plug in an external hard drive via USB. Using an external storage device, you can save video, audio, photos, and game data.

With an ICY DOCK hooked up to your PS3, you have almost unlimited storage capabilities. Utilize separate drives/trays for various media types, or unplug from your PS3 and use the drive to back up your newest vacation photos. If you run out of room, just pop in a fresh drive and you are back to square one!

And, with the newest color of our popular single bay series, your dock will be functional and stylish, all with the quality and simplicy that ICY DOCK gaurantees with all of our products!

Heres how you do it:

*Connect the ICY DOCK to your computer using a USB cord and switch unit power to ON.

*Check what the "File System" type is by going to Start, Control Panel, Administrative Tools, Computer Management, Disk Manager. Select the ICY DOCK and read the "File System" type. The file system type must be "FAT32" in order for the Playstation to recognize it.


*If the file system type is "NTFS", right click and select "Delete Partition" or "Delete Volume" for Vista.


*Then recreate the partition but do NOT format it. Make sure you assign a drive letter (for this Tutorial, we'll use H:)


*If you are running Windows, format the drive by going to the command prompt (Vista, right click on command prompt in start menu and click "run as administrator")and type in "format h: /FS:FAT32" (without the quotes). You may need to substitute your drive letter. (note this might not work on XP for a large hard drive - you may have to use a third-party formatting utility like SwissKnife; however, it does work under Vista - just be sure to use the format command from the DOS prompt, not from Windows Explorer)


*If you are using Mac OS X, open /Applications/Utilities/Disk Utility.app, pick the drive, and click on the 'Erase' tab. Pick 'MS-DOS (FAT)' for the file system type, and click on the 'Erase' button. This will reformat the drive in FAT-32.


*If you have Mac OS X Leopard: Open /Application/Utilities/DiskUtility.app, pick the drive and click on the 'Partition' tab. Pick '1 Partition,' for the Volume Scheme, and 'MS-DOS (FAT),' for the Format. Click the 'Options...' button (near the bottom) and select 'Master Boot Record.' Press 'Okay' and then 'Apply.'


*Open "My Computer" and double-click on your ICY DOCK.


*Create a folder system identical to that on the Playstation 3 by creating folders labeled "Picture" (not Photo), "Music", "Video" and "Game".


*Load all media into their proper folders. Your game folder should still be empty.


*Safely disconnect the ICY DOCK.


*Connect the ICY DOCK to your Playstation 3.


EXTRA TIPS AND TRICKS


*Game data can be saved the external HDD as well.


*Supported File Types for PS3

-Video: MPEG 4, MPEG 2, AVI, WMV, DIVX
-Audio: MP3, MP4, ATRAC, WMA, MP4

*Open Source Video Converters

-For Windows, MEDIA CODER
-For Mac, FFMPEGX

*Swissknife Download Page


*Use the ICY DOCK to create a hassle free transfer from you old internal HDD to your new internal HDD via our MB882SP-1S-1B 2.5” to 3.5” SATA HDD Converter Box.


---------------------------------------------------------------------------------------------------------------------------------------------

installation source: http://www.wikihow.com/Add-an-External-Hard-Drive-to-a-PlayStation-3